Up to $250 Off
Enter your email below to get the offers!
Potentially Difficulty Situations When Installing a Wall Safe
We are not responsible for any injury to yourself or others, any damage to your wall, your tools, or your wall safe. These directions are only to assist with installation.
|
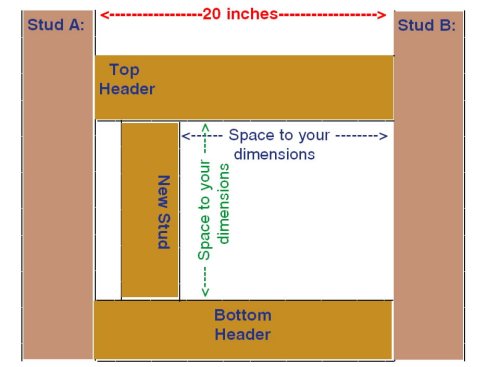
You have purchased a wall safe, and now are faced with where it will be installed. First off you need to be aware that there might be hidden utilities in the wall throughout the house as well as other unknown obstacles. Hidden utilities may include such things as heat ducts, water lines, electrical wiring, cable television wiring. Some houses are wired throughout with wiring for a central stereo. This means that the stereo is located in one room with wires routed throughout the dwelling to other rooms, usually within the walls, terminating at speakers which might be located in the walls. Some other unknown obstacles might include, but not inclusive to all situations, could be such things as plumbing vents. These are pipes that are routed from your plumbing system up through the wall through the roof that allow air to enter the system so that when you drain you bath tub let's say, the suction created from the water going out does not pull the water from the trap and thus allowing sewer gases from entering your house. Some older houses were built long before there were standards in construction. This creates the problem of stud spacing. When someone built, they built according to what they had, thus the spacing varies. If the wall covering was such that they could space the studs say 20 inches apart, that was done. Should you have a house as this, you will need to modify your installation to compensate for this. In this situation, you will be required to install headers between the studs, Top and Bottom of where you want to locate your safe. Then install an additional piece (new stud), to close the distance to allow the safe to be fastened through the inner side walls. |

|
Some older houses were constructed of Planks. These create the problem of not being able to just use a utility knife to cut through the wall board as in newer house construction. You will need a saw in this situation. Also these walls were usually covered with what is known as lath and plaster. Lath is slats of wood 1 inches wide, by 4 foot long. These were nailed to the planking, and then a layer of plaster applied over them to create a smooth surface. If you find that you have this situation, be cautious when cutting the opening to not disturb the lath that you are cutting creating cracks in the plaster. Should this happen, a light coat of today's wall board compound, will remedy minor glitches. Re-paint, and or repairing the surface finish as needed. What if the location you choose has the studs too close together. |

|
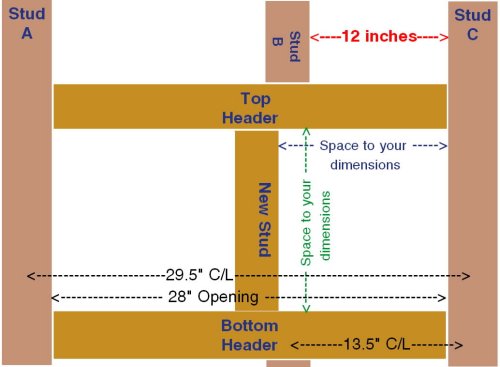
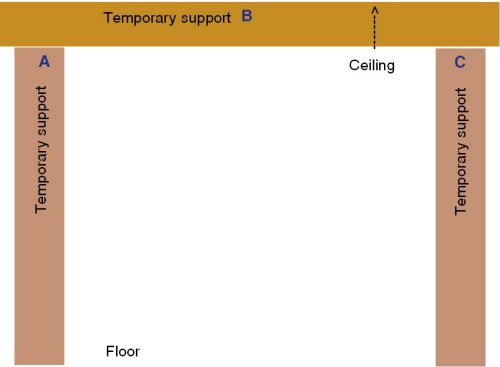
In this situation you will be required to do a more extensive installation, but still possible. First again confirm that there are no utilities, electrical wiring, heating ducts, pipes, excreta, then you will need to locate the stud that is closest to the location that you want your safe installed, (For our demonstration we started on the right STUD C ). Once we determined that the next stud to the left (STUD B ) was not going to allow us to have sufficient spacing, (we found that the spacing between the studs was only 12, or spaced 13.5 O/C in our old house). We then continued moving to the left until we located the next closest stud (STUD A ), which we found was spaced 29.5 O/C, meaning the opening would then be 28, much too large for our application. We then determined that we needed to install headers to first support the stud ( B ), that we were required to cut through. We confirmed that this stud was not a supporting stud, Supporting meaning that if we cut it temporarily there would be no damage to the structures integrity, until we could install our headers. Should this be a supporting wall, we would need to install temporary supports in our room to take the load while we constructed headers to support our installation. |

|
To accomplish this we acquired 4 X 4 posts of sufficient length to reach from the floor to a 4 X 4 along the ceiling, making sure to have a wedge fit. Allow yourself sufficient space to perform your installation comfortably. Should the floor be of a special material such as Marble, carpeting, something that might be damaged easily, you will want to allow for a board, piece of plywood, to distribute the weight of the temporary supports and not damage the flooring. Once you have the temporary supports in place, you can begin the final steps to your installation. NOTE: When installing your top header, (due to this being a supporting wall) you will need to double up the header, to carry the weight above. Use a piece of x 3 X (length to fit your header pieces) of Plywood to space your header 2 X 4 pieces. You will need to remember and cut the portion of stud that you are removing high enough to allow the extra support, also along the right stud you will need to allow for a 2 X 4 (Header Support) to be installed. |

NOTE: You may have to make your opening larger to allow for the installation of the header. Not a problem, the extra opening can be closed down once you have the final opening established.
Install the lower header, then the upper header tacking them to hold them in place until you can fasten the Header supports to the left and right original studs. Deck screws, and or nails, are good fasteners, with deck screws being the preferred method. We suggest Deck screws rather than Drywall screws because they are of a heavier wire size.
Once you have the Headers firmly fastened in place you will now need to install your New Stud. To do this Determine it's location, then measure 1 (remember we are working from the right for this illustration).
At the marks you made you will need to install a 2 x 4 block at the top and bottom (extending left) to make a place to fasten your New Stud.
Install your New Stud again fastening with deck screws, nail, which ever you prefer.
If you had to make the opening in the wall larger than the final safe opening, you can use the wall board removed, to close down the opening, you might be able to install sheetrock, whatever it needs.
Should your original wall covering be thicker than the sheetrock used in today's construction, you might need to shim out the new supporting headers and supports to end with the patch area flush with the original wall surface.
Then use joint tape, and joint compound to fill cover the joint between your patch and the original wall. Smooth, paint and or finish to match the original wall covering.
You may now continue with the manufacturers installation instructions that came with the safe.
Possible Difficult Situations Installing a Wall safe
We are not responsible for any injury to yourself or others, any damage to your wall, your tools, or your wall safe. These directions are only to assist with installation.
|
You have purchased a wall safe, and now are faced with where it will be installed. First off you need to be aware that there might be hidden utilities in the wall throughout the house as well as other unknown obstacles. Hidden utilities may include such things as heat ducts, water lines, electrical wiring, cable television wiring. Some houses are wired throughout with wiring for a central stereo. This means that the stereo is located in one room with wires routed throughout the dwelling to other rooms, usually within the walls, terminating at speakers which might be located in the walls. Some other unknown obstacles might include, but not inclusive to all situations, could be such things as plumbing vents. These are pipes that are routed from your plumbing system up through the wall through the roof that allow air to enter the system so that when you drain you bath tub let�s say, the suction created from the water going out does not pull the water from the trap and thus allowing sewer gases from entering your house. Some older houses were built long before there were standards in construction. This creates the problem of stud spacing. When someone built, they built according to what they had, thus the spacing varies. If the wall covering was such that they could space the studs say 20 inches apart, that was done. Should you have a house as this, you will need to modify your installation to compensate for this. In this situation, you will be required to install headers between the studs, Top and Bottom of where you want to locate your safe. Then install an additional piece (new stud), to close the distance to allow the safe to be fastened through the inner side walls. |
|
Some older houses were constructed of Planks. These create the problem of not being able to just use a utility knife to cut through the wall board as in newer house construction. You will need a saw in this situation. Also these walls were usually covered with what is known as lath and plaster. Lath is slats of wood 1 � inches wide, by 4 foot long. These were nailed to the planking, and then a layer of plaster applied over them to create a smooth surface. If you find that you have this situation, be cautious when cutting the opening to not disturb the lath that you are cutting creating cracks in the plaster. Should this happen, a light coat of today�s wall board compound, will remedy minor glitches. Re-paint, and or repairing the surface finish as needed. What if the location you choose has the studs too close together. |
|
In this situation you will be required to do a more extensive installation, but still possible. First again confirm that there are no utilities, electrical wiring, heating ducts, pipes, excreta, then you will need to locate the stud that is closest to the location that you want your safe installed, (For our demonstration we started on the right STUD � C �). Once we determined that the next stud to the left (STUD � B �) was not going to allow us to have sufficient spacing, (we found that the spacing between the studs was only 12, or spaced 13.5� O/C in our old house). We then continued moving to the left until we located the next closest stud (STUD � A �), which we found was spaced 29.5� O/C, meaning the opening would then be 28�, much too large for our application. We then determined that we needed to install headers to first support the stud (� B �), that we were required to cut through. We confirmed that this stud was not a supporting stud, Supporting meaning that if we cut it temporarily there would be no damage to the structure�s integrity, until we could install our headers. Should this be a supporting wall, we would need to install temporary supports in our room to take the load while we constructed headers to support our installation. |
|
To accomplish this we acquired 4� X 4� posts of sufficient length to reach from the floor to a 4� X 4� along the ceiling, making sure to have a wedge fit. Allow yourself sufficient space to perform your installation comfortably. Should the floor be of a special material such as Marble, carpeting, something that might be damaged easily, you will want to allow for a board, piece of plywood, to distribute the weight of the temporary supports and not damage the flooring. Once you have the temporary supports in place, you can begin the final steps to your installation. NOTE: When installing your top header, (due to this being a supporting wall) you will need to double up the header, to carry the weight above. Use a piece of �� x 3 �� X (length to fit your header pieces) of Plywood to space your header 2� X 4� pieces. You will need to remember and cut the portion of stud that you are removing high enough to allow the extra support, also along the right stud you will need to allow for a 2� X 4� (Header Support) to be installed. |
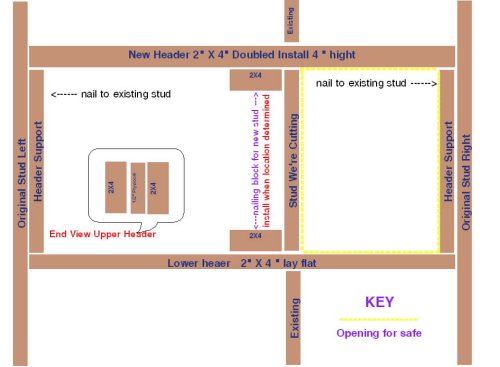
NOTE: You may have to make your opening larger to allow for the installation of the header. Not a problem, the extra opening can be closed down once you have the final opening established.
Install the lower header, then the upper header tacking them to hold them in place until you can fasten the Header supports to the left and right original studs. Deck screws, and or nails, are good fasteners, with deck screws being the preferred method. We suggest Deck screws rather than Drywall screws because they are of a heavier wire size.
Once you have the Headers firmly fastened in place you will now need to install your �New Stud�. To do this Determine it�s location, then measure 1 �� (remember we are working from the right for this illustration).
At the marks you made you will need to install a 2� x 4� block at the top and bottom (extending left) to make a place to fasten your �New Stud�.
Install your �New Stud� again fastening with deck screws, nail, which ever you prefer.
If you had to make the opening in the wall larger than the final safe opening, you can use the wall board removed, to close down the opening, you might be able to install sheetrock, whatever it needs.
Should your original wall covering be thicker than the sheetrock used in today�s construction, you might need to shim out the new supporting headers and supports to end with the patch area flush with the original wall surface.
Then use joint tape, and joint compound to fill cover the joint between your patch and the original wall. Smooth, paint and or finish to match the original wall covering.
You may now continue with the manufacturers installation instructions that came with the safe.